The beginner’s guide to light

You may know your camera’s burst rates, buffer size, AF points, megapixels and the rest (and you should) but the photographer who can also evaluate, anticipate and manipulate light will always take the best shots, says Dom Salmon
Light is one of the most fascinating things in the universe. From Caravaggio’s simmering shadows, Turner’s intangible mists and the first glass plate capturing an image right up to today’s highly advanced digital mirrorless cameras, light has been, and remains, the greatest tool of any artist.
As well as being amazing at capturing images, modern camera sensors also have huge dynamic range (the amount of usable detail from light to dark). For comparison, slide film was notoriously unforgiving when you went outside its useable dynamic range, with shadows and highlight detail unreachable, whereas digital RAW negatives can be incredibly versatile at much wider contrast ranges, enabling you to pull detail out of almost black shadows. Couple this with advanced light metering, and cameras can analyse 99% of scenes and return a pin-point exposure for your subject, from intimate portraits to sweeping landscapes. So, why worry about light when you can just point and click and let the camera do the work?
The answer is because they are your pictures, and the more involved you are in every decision – subject, framing, lens and, most of all, the way you use light – the more ‘you’ your pictures will become.
For professionals, creating a personal style is what makes clients seek us out. But, even if you don’t aspire to turn pro, developing a personal way to capture moments in your life will be the single most rewarding thing you can do with your camera — and the most powerful tool you can use to achieve that is light.
There are libraries full of books on light and thousands of videos on YouTube, but the best way to learn is by doing, so here are some of the basics to get you out of the door, camera in hand.

Hard and soft light
There are two types of light that will hit your subject. Hard and soft. Think of a sundial. On a bright summer’s day, its shadow will be clearly defined, with sharp edges and effectively a deep, solid black. That’s hard light. On a cloudy midwinter’s day, you’ll barely see that same sundial shadow, if at all. That’s soft light.
In the summer, the sun’s rays are coming straight to us. They’re super-bright, with nothing in their way for 93 million miles. That’s why the sundial’s shadows are so sharp. Conversely, in winter the sun is weaker, and has thousands of feet of cloud to get through, and so is very diffuse, hence no real contrast or definition in the light it casts. Think of it as being like a garden hose that’s either a powerful jet or diffused mist. It’s still water getting sprayed in your face – it’s just coming at you differently.
This is the single most important thing to consider and will change the way you think about light. Because it’s not the quantity of light that’s important, it is the quality.
When you start taking pictures, you might think, “More light, great!” Click! A bright day means you can have faster shutter speeds, handy for capturing movement, and lots of light means closing down the aperture and getting more of the shot in focus, right? So, midday summer sunshine should be the best time to shoot anything? Think again. It’s a very harsh light and if it’s right above you while you’re shooting a person, you’ll basically turn them into a panda from the shadows it casts. Very unflattering. Plus, that amount of light will force you to stop your aperture down and your subject will start to merge into your background, creating a busy, ‘flat’ image.
Move that same subject under a tree, though, and that light will now be beautifully diffused through the leaves, the shadows will be softer and more flattering, and you can open up your aperture more to blur the background, separating the subject in the final shot from the overall scene very nicely. Same subject, same location, same light but, by moving the shot ten feet, it can look totally different. Congratulations, you’ve just made a creative choice with your shot by recognising the quality of light you wanted to use.
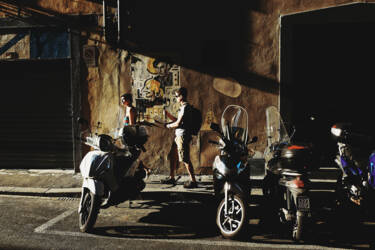
This isn’t to say you can’t use hard light. Again, what do you want to say in your shot? Hard light can make things look incredibly dramatic and make colours really pop. I love it just as much as soft light, just in a different way. In street photography, for instance, I love creating huge areas of almost impenetrable shadow with hard light.
This shot below, for example, was taken while directing a video project in Florence, where a fairly punishing afternoon sun gave this image shadow and drama.
This scene below, by contrast, has no direct light on it, it’s coming in from the surrounding windows — and by complete chance the boy in the middle was in a pool of very diffuse light. You can see how low light it was as my aperture was wide open so the only sharp point in the frame is him (thank you, autofocus!)

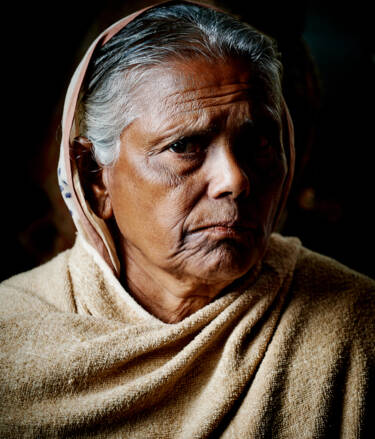
While softer lighting seems the automatic choice, don’t rule it out for portraits. I captured this image below right in Bangladesh on the go. Normally I might have been tempted to play around with at least a reflector to soften the dark side of the face, but then there’s no shot. A hugely bright afternoon sun was coming full through the window and did all the work to make the picture.
By contrast, this shot below left is 100% soft light, and gives a much calmer, more open feel to the picture. It was an overcast day that, in this case, was useful, otherwise this shot would have been very harshly top-lit with unflattering shadows. Whereas a very soft ambient light (though plenty of it), meant I could soften it with a wide aperture, use a low ISO to preserve detail, and let a high shutter speed take the light. Again, no need for a reflector, and a light turn of the subject gave a little depth to the face.

Colour temperature
You’ve probably got LED lights somewhere that are ‘warm white’ or ‘cool white’, where warm has a more yellow/orange glow and cool is at the bluer end of the spectrum. This is colour temperature and is an essential quality of the light you are working with on a shoot.
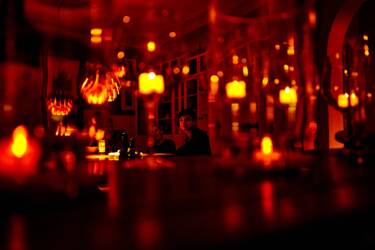
Here’s an example of a shot lit totally with ‘warm’ light sources such as old tungsten filament bulbs and candlelight. Instead of ‘correcting’ them to white, I left the camera setting as ‘daylight’, rendering the overall light lovely and warm.
Contrast that deep orange glow with this shot below. It’s not quite midday, as you can see from the slightly longer shadows, but the light here is super ‘cold’ — bleaching the scene slightly, removing saturation for a very stark effect.
This is because midday sunlight is roughly white, having a ‘temperature’ of about 5500K. This is also the colour temperature of flash and constant video lights, as they are calibrated to cast a white, neutral light (although with LEDs you can now get light panels that have different colour temperature options available).
In the real world, colour temperature isn’t nearly as important as it used to be, because with digital cameras it’s pretty easy to correct an overall temperature by adjusting the image’s White Balance, i.e. telling the image what colour temperature it should see as ‘white’. Even your smartphone will allow you to select this ‘white point’ with a simple slider. As long as it’s not a huge shift, the effect will appear very natural and not be noticeable.
The real problem comes when you mix temperatures of light sources in the same image. Then, you can’t simply correct the overall White Balance, and it all becomes very fiddly trying to even it out.
This can be a pain if, for instance, you have someone lit by fluorescent light (which can be a nasty green colour) but with a window in the background. Correcting for just one will leave the other one looking odd, so it’s important to check the light sources in your frame, because the more you mix them, the bigger the potential headache.
That said, mixing temperatures can be an effective tool. In the image below, I kept the tungsten light on in the background, and then positioned the guy so his blue outfit was lit by the very diffuse daylight from outside. By over-exposing the light so it ‘blows out’ and isn’t over orange, it produced a warmer background, allowing the ‘colder’ foreground subject to stand out without looking like an unnatural effect.
In the image of the waitress at the start of this article, the very ‘warm’ room allows the waitress to pop from the background as she is being lit by the very ‘cold’ light of her computer screen. I exaggerated this further by setting the exposure for her, as I was happy to let the rest be pretty dark and more of a ‘suggested’ background than a key element in the picture.
Both were shot with a Nikon D810, with no lights, no flash, not even a reflector — just adding a little contrast to the original RAW. In the days of film, these would have come out as a dark smudge with the same camera settings. My mirrorless Nikons are even more remarkable in low-light situations so there’s no excuse to not push your experimentation.

Next steps
There will be plenty of time to get into light sources such as flash, soft boxes, key lights and many others. For now, you have all the light sources you need to get going – the sun and your house lights! So, go and get your camera and get shooting.
While you do, start asking yourself things like, “What difference does the time of day make to this shot?” “Where am I in relation to the light and my subject?” “Will those clouds totally change this scene in the next ten minutes?”
Keep a notebook with you. A basic sketch of where the sun, you and your subject are — and the time of day and weather – can be really useful when you review your photos later and can help you gain knowledge so you’ll know how to repeat a great shot.
One invaluable piece of equipment is a simple photography reflector that comes with white, silver, gold, translucent and black reflective panels. These are magical things. They’re cheap and, even without an assistant, you can do a huge amount with them. I never leave home without one, although, at a push, I’ve pressed the odd blank sketchbook page or white tablecloth into service.
A subject’s face a little dark compared to the background? Get the subject to hold the reflector up in front of them (below the camera frame) to bounce back a little light and brighten their face, reduce harsh shadows and add a nice ‘ping’ in their eyes. A little reflected light makes a huge difference to a shot.
Light a little harsh coming in through that window? Use the translucent screen to diffuse and take the sting out of it.
A reflector is so important to kick off your journey from snapper to photographer because once you ‘get’ what kind of light you have and understand its make-up, you can start to think how you can change it. And that’s the first step to a whole new world of image-making.
Deepen your understanding
More by Dom Salmon
Unlock greater creativity
